Molded silicone parts come out with a dry, draggy surface. When a finger slides across it, there is noticeable resistance. Leave it on a desk for two days, and it picks up a layer of dust.
This isn’t a mold problem. Silicone itself has a surface energy of only about 22 mN/m. It naturally resists ink, attracts dust, and feels slightly tacky or dry to the touch. That is why silicone products almost always need one more step after they come out of the mold: surface finishing.
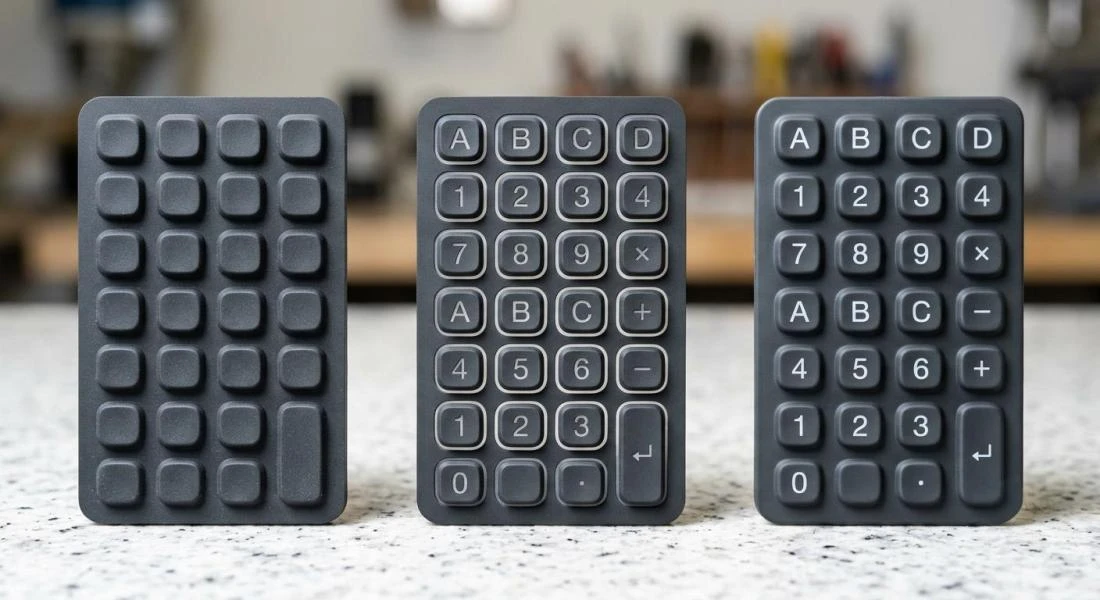
Screen printing, pad printing, laser etching, and tactile coating—these four terms come up most often in the silicone industry, and customers ask about them more than anything else. But they are not a one-out-of-four choice. In real production, they are often used in combination. A silicone keypad may use screen printing as the base process, laser etching for the characters, and then a tactile coating as the final layer. Three processes can be linked into one production flow.
This article breaks them down one by one: what each process can do, what it cannot do, how it differs from the other three, and how they are combined on the production line.
Screen Printing: The Best Value for Flat Surfaces
Screen printing is exactly what the name suggests. The principle is simple: make a screen, create open areas for the pattern, force the ink through the mesh onto the silicone surface, then bake it to cure.
But it has several hard limits that matter.
First, it only works on flat surfaces or slight curves. The screen itself is flat, and a squeegee presses it against the silicone surface during printing. If the product has obvious recesses, steps, or a large radius curve, the screen can’t make proper contact. Once contact is poor, ink bleeds, edges blur, and registration shifts. Silicone has some flexibility, so a mild curve can sometimes be handled with a fixture that flattens the part. A recessed design is usually out of the question.
Second, one color means one process step. Screen printing can only print one color at a time. After the first color is printed, the part must go into an oven at 150–180°C for 5–10 minutes so the ink sets before the second color can be applied. Three colors mean three printing cycles and three baking cycles. Time doubles, and cost doubles with it. If the graphic is complex and uses many colors, the cost advantage of screen printing gets eaten up by the number of process steps.
Third, the characters feel raised. Screen printing ink is typically 10–20 μm thick. After drying, the printed characters sit slightly above the silicone surface. You can feel that with a fingertip. That matters because it creates a very different user experience from laser etching, which will be covered later. On products where button feel matters—such as remote controls or game controllers—raised characters and recessed characters create completely different tactile feedback.
The adhesion of screen printing ink depends on one condition: the silicone surface must be activated before printing. That will be covered in a separate section below.
Screen printing has medium-to-high durability. Under normal use, the characters can handle routine rubbing and won’t peel off in a few months. But compared with laser etching, it is in a different durability class.
When should screen printing be used? If the surface is flat, the graphic uses no more than two colors, the budget is tight, and no backlighting is needed, screen printing is the most economical choice.
Pad Printing: The Only Practical Option for Curved and Irregular Surfaces
Pad printing solves the problem that screen printing cannot solve: curved surfaces.
The principle is easy to understand. First, a steel plate is etched with recessed image areas. Ink fills those recesses. Then a silicone transfer pad presses onto the plate, picks up the ink, and transfers it onto the product surface. The process is like stamping a seal—the pad is the stamp, the steel plate is the ink source, and the product is the paper.
That silicone pad is the key. It is soft and deformable, so it can conform to curved, spherical, uneven, and contoured surfaces. That is something a flat screen cannot do.
Pad printing ink is about 50 μm thick, roughly two to three times thicker than screen printing. The printed characters have a slight dimensional feel, but not the obvious raised feel of screen printing. It is closer to a very light embossed layer.
Two points need attention:
Registration accuracy is harder to control than screen printing. The pad is soft, and the shape change during each press is never the same. For fine characters, narrow borders, or precision graphics, pad printing usually has more positional variation than screen printing. If the design has tight tolerance requirements, confirm with the factory whether they can hold that level.
The printable area in one pass is limited. The contact area of the pad is usually not large. Pad printing is not ideal for large graphics. The options are either multi-pass printing with seam risk or switching to screen printing.
Pad printing ink belongs to the same silicone-specific ink system as screen printing ink, so the adhesion principle is the same—the surface must be activated first. Once properly cured, durability is at the same level as screen printing.
When should pad printing be used? If the product surface is curved, spherical, or uneven, or if the print position sits inside a recessed button area, pad printing is the only practical choice. Most of the small characters on calculator keypads and telephone buttons are made with pad printing.
Laser-Etched Characters Can Last for 10 Years Without Wearing Off
Laser etching is a completely different kind of process from screen printing and pad printing. Screen printing and pad printing add material to the surface through ink adhesion. Laser etching removes material from the surface through laser ablation.
The process uses a focused laser beam on an existing coating layer on the silicone surface. The laser precisely burns away that top layer and exposes the color underneath. If the lower layer is transparent and paired with LED backlighting, that is how backlit silicone keypads are made.
Laser etching offers three capabilities that screen printing and pad printing cannot match:
Its precision is at the micron level. The laser spot can be focused to an extremely small point, so it can create fine lines and tiny characters that a screen simply cannot reproduce.
The characters are recessed. The laser removes the top coating, so the character area sits about 0.02–0.05 mm lower than the surrounding surface. A fingertip feels a recess. Screen-printed characters feel raised. For users who care about tactile feedback, that difference is dramatic. Think about a remote control: when operating by touch alone, raised characters and recessed landmarks create two completely different experiences.
The characters do not wear off. Screen-printed and pad-printed characters are just a layer of ink sitting on the surface. Given enough time and abrasion, they will eventually wear away. Laser-etched characters are cut into the coating layer. Unless the entire coating is worn through, the characters remain. Buyers for industrial equipment keypads and outdoor instrument panels almost always specify laser etching.
Laser etching has one prerequisite: the silicone surface must already have a coating layer. The usual method is to spray a dark base coat first, then a lighter top coat, and then use the laser to burn off the top coat and expose the base color. For backlit keys, the base coat is translucent or white, the top coat is a dark light-blocking color, and an LED is placed behind the part. Light comes through the laser-opened character area with clean edges and minimal light leakage.

When should laser etching be used? If the product needs TO BE LED backlighting, permanent character durability, or recessed tactile feedback, laser etching is mandatory, not optional.
Spraying a Tactile Coating Does More Than Make the Surface Smooth
Tactile coating is the most misunderstood of the four processes. Many people think it is just a decorative layer that makes silicone feel smoother. In practice, it is a functional protective film.
After compression molding, silicone parts have a draggy surface. That comes from silicone’s naturally high friction coefficient plus a small amount of static attraction generated during processing. Without treatment, the product picks up dust after sitting for only a couple of days, and a finger sliding across it feels resistance.
Tactile coating, also called a matte coating, is a transparent layer about 5–15 μm thick. It is sprayed onto the silicone surface and then baked at 150–180°C for 10–15 minutes to cure. It does three things:
It removes the drag and creates a smoother touch. The coating fills the microscopic unevenness of the silicone surface. A finger glides across it smoothly, with a fine peach-skin feel rather than the slickness of plastic.
It reduces static and dust pickup. Silicone easily builds up static during mixing and molding, which attracts dust. A tactile coating can significantly reduce surface static, so the product can sit in a bag for a month and still come out clean.
It protects the graphics underneath. Spraying a tactile coating after screen printing or laser etching adds a protective film over the characters and graphics. Wear resistance improves by a full step.
Tactile coating also has limits. It is transparent, so it cannot change the product color. If the part needs a color change—for example, turning translucent silicone into black—the process must start with a colored base coat before the later finishing steps.
There is also an upgraded option: PU coating. Its thickness is 10–20 μm, and its curing temperature is lower at 120–150°C. But it offers better wear resistance and chemical resistance than standard tactile coating. Functional products such as conductive silicone contacts and reading pen tips typically use PU coating rather than standard tactile coating.
When should tactile coating or PU coating be used? Almost all silicone keypads and protective cases need it. It is the final finishing step in most builds. Unless the product has no surface feel requirement at all—such as an industrial sealing gasket—tactile coating is standard.
Pretreatment: The Prerequisite for Every Finishing Process
In actual production, this step comes first.
Silicone has a surface energy of only about 22 mN/m. For comparison, water has a surface energy of 72 mN/m, and most inks and coatings need the substrate surface energy to be at least 38–42 mN/m for effective adhesion. What does 22 mean in practice? It means a drop of ink beads up like water on a lotus leaf. It does not wet out across the surface.
So before any printing or coating, the silicone surface must be activated. Surface energy must be increased so the ink can wet and bond.
Three activation methods are widely used in the industry today:
Plasma treatment — High-energy plasma bombards the silicone surface and introduces polar groups such as hydroxyl and carboxyl groups into the molecular chain. A 2025 study published by MDPI showed that plasma treatment can increase rubber surface energy by 58%. The effect is uniform, controllable, and environmentally friendly. It is the current mainstream solution.
Corona treatment — High-voltage discharge generates ozone to oxidize the surface. It costs less than plasma treatment and fits continuous production lines well. But treatment uniformity is not as good as plasma.
Primer — A chemical coupling layer is sprayed onto the surface to form a bridge between the silicone and the ink. It offers the best cost-performance ratio and is common for small batches. The drawback is that it adds another process step and another variable. If the primer is not fully dry or is sprayed unevenly, the print can still fail.
In short, when a customer asks why a printed logo peels off easily, the problem is almost never the ink itself. In 99% of cases, the surface was not activated, or the activation was not done properly.
Quick Comparison of the Four Processes
| Category | Screen Printing | Pad Printing | Laser Etching | Tactile Coating |
|---|---|---|---|---|
| Principle | Ink passes through a screen | Silicone pad transfers ink | Laser ablates the coating | Transparent coating is sprayed on |
| Precision | Medium | Medium | Micron-level | Not applicable |
| Thickness / Depth | 10–20 μm | About 50 μm | 0.02–0.05 mm recessed depth | 5–15 μm |
| Suitable Surface | Flat / slight curve | Curved / spherical / uneven | No major limit | No major limit |
| Character Feel | Raised | Slight embossed feel | Recessed | Smooth matte feel |
| Durability | Medium to high | Medium to high | Very high, does not wear off | Medium to high |
| Light Transmission | No | No | Yes | Transparent and light-transmissive |
| Multicolor Capability | Multiple print-and-bake cycles | Multiple print cycles | Only reveals the underlying coating color | Transparent and colorless |
| Relative Cost | Low | Medium | High | Medium |
| Typical Applications | Large logos, multicolor graphics | Small keypad characters, irregular parts | Backlit keys, remote controls | All keypads and protective cases |
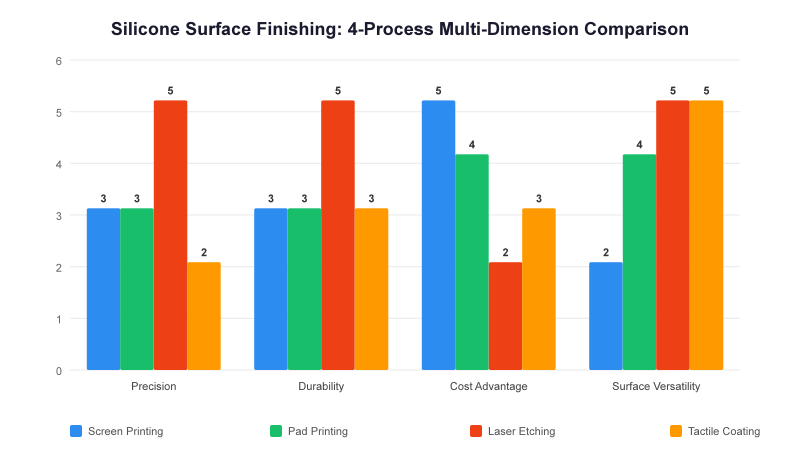
After reviewing this table, the conclusion is straightforward: these four processes do not compete with one another. They stack. On a real production line, a silicone keypad usually combines two or three of them.
How to Choose: Decide with Four Questions
Do not start by asking whether to use screen printing or laser etching. Answer these four questions first:
Question 1: What kind of surface will the characters go on?
Flat or slightly curved surface — screen printing. Curved, spherical, or uneven surface — pad printing. This is a physical limit, not a preference. If the product has both flat graphics and curved-area characters, then it needs a screen printing plus pad printing combination. Many remote controls are made this way: the front logo is screen printed, and the side button characters are pad printed.
Question 2: Does it require light transmission?
If LED backlighting is required, use laser etching. There is no reason to hesitate. Screen printing and pad printing inks block light, so they cannot create a true backlit effect. Laser etching is the only process that can produce illuminated characters with clean edges and no light bleed.
Question 3: How durable do the characters need to be?
Industrial equipment, outdoor instruments, and automotive center controls may be pressed hundreds of times a day, exposed to sunlight, and wiped with cleaning agents. In these conditions, screen-printed or pad-printed characters may begin to wear in one or two years. Laser-etched characters last as long as the product itself.
Consumer electronics and household appliance remotes operate in milder conditions and at lower usage frequency. In those cases, screen printing or pad printing is fully adequate and much more cost-friendly.
Question 4: What is the budget ceiling?
From low to high, cost usually follows this order: screen printing < pad printing < tactile coating < laser etching.
But one point matters: although laser etching has a higher per-process cost, it does not require consumables such as screens or etched steel plates. Laser marking is digital. Changing the design only requires a program change. If the product has many variants—for example, one keypad offered in five language versions—the marginal cost of laser etching can actually be lower than screen printing, because screen printing needs a new screen set for each language.
The Three-Step Method: The Most Common Combination in Production
Now that each process has been broken down by strengths and limits, the next question is how they are actually combined on the line.
In the silicone keypad and Silicone Case sector, one standard combination has been validated countless times:
Step 1: Spray a colored base coat. The molded silicone part first receives a color layer, usually a dark tone such as black or dark gray. This covers molding color variation and creates a contrast base for later laser etching.
Step 2: Laser etch the characters. The laser removes the top coat and reveals the base color or light-transmitting layer underneath. This step determines character precision and backlighting performance.
Step 3: Spray tactile coating. This is the sealing and protection step. It smooths the surface, reduces dust pickup, and protects the laser-etched characters from wear.
After these three steps, the finished product has a uniform color, clear recessed characters, and a fine, smooth surface feel. That is the kind of silicone keypad commonly seen on electronic dictionaries, remote controls, and automotive center consoles.
Not every product needs all three steps. Some simple protective cases only need tactile coating because they have no characters. Some silicone gaskets need no finishing at all because sealing performance does not depend on appearance. The key is to understand what level your product belongs to. Do not pay for process steps you do not need, and do not skip the steps that matter.
If the product requires a printed logo, durable characters, and good tactile feel, the three-step method fits it perfectly. In that case, it is best to work with a supplier that has a complete in-house surface finishing line, including coating, laser etching, and screen or pad printing. Avoid moving semi-finished parts from one plant to another. Dust contamination or surface contact during transfer can ruin the downstream process.
When evaluating a Silicone Product Supplier, ask one more question: Is the surface finishing done in-house or outsourced? Is the process chain complete on one line?