If you are planning custom silicone phone suction pads, there are technical details to consider beyond shape, color, and logos. How does the pad attach to a phone case? What matters in the design of the small suction cups? How should samples be tested for adhesion?
For example, adhesive-backed pads and double-sided suction pads attach differently. Strong resistance to a brief outward pull does not establish how long a phone can remain suspended. We will explain these differences before looking at details that are easy to overlook in structural design and sample testing.
Adhesive-Backed vs. Double-Sided Pads: Attachment to the Phone Case
On an adhesive-backed, single-sided pad, one side of the adhesive layer contacts the silicone pad and the other contacts the phone case. The outward-facing suction cups attach to the mirror. When choosing the adhesive, check whether it bonds securely to both the silicone pad and the actual phone case, including any coating on the case. Follow the instructions for the selected adhesive material to determine surface preparation, pressure after bonding, and the waiting period before a phone suspension test.
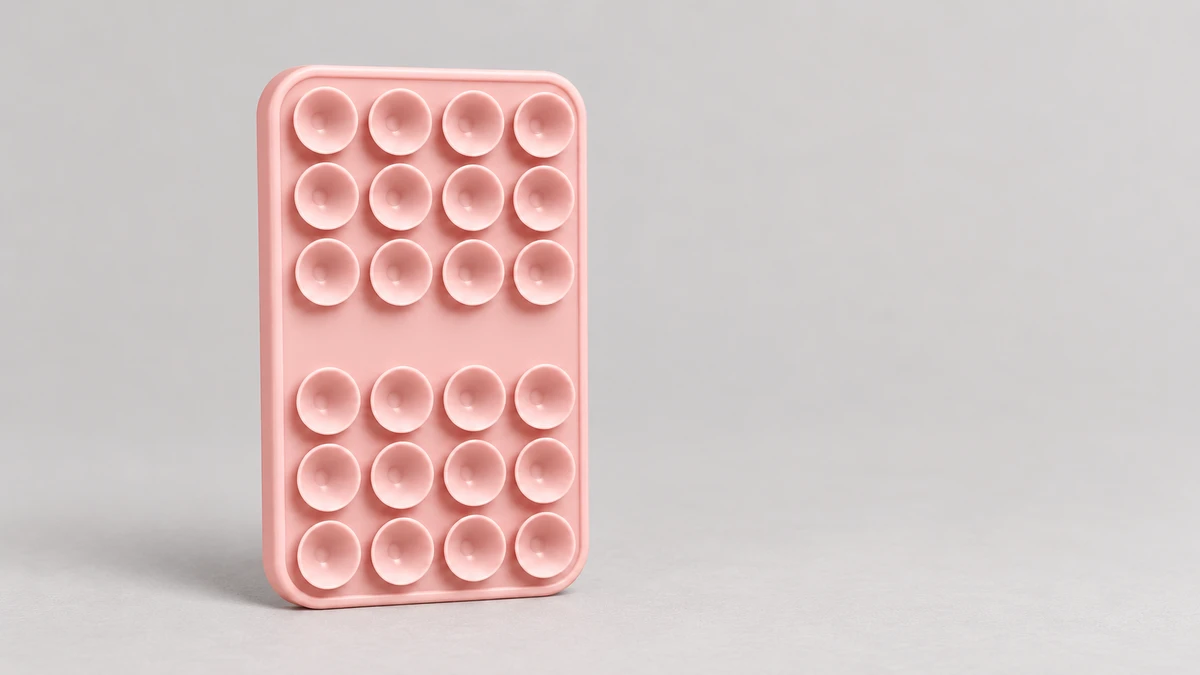
On a double-sided suction pad, the cups on one side attach to the phone case and those on the other attach to the mirror. The cup edges on both sides need to seal against their surfaces. Texture, curvature, or raised features on the phone case may prevent the cups on that side from sealing properly.
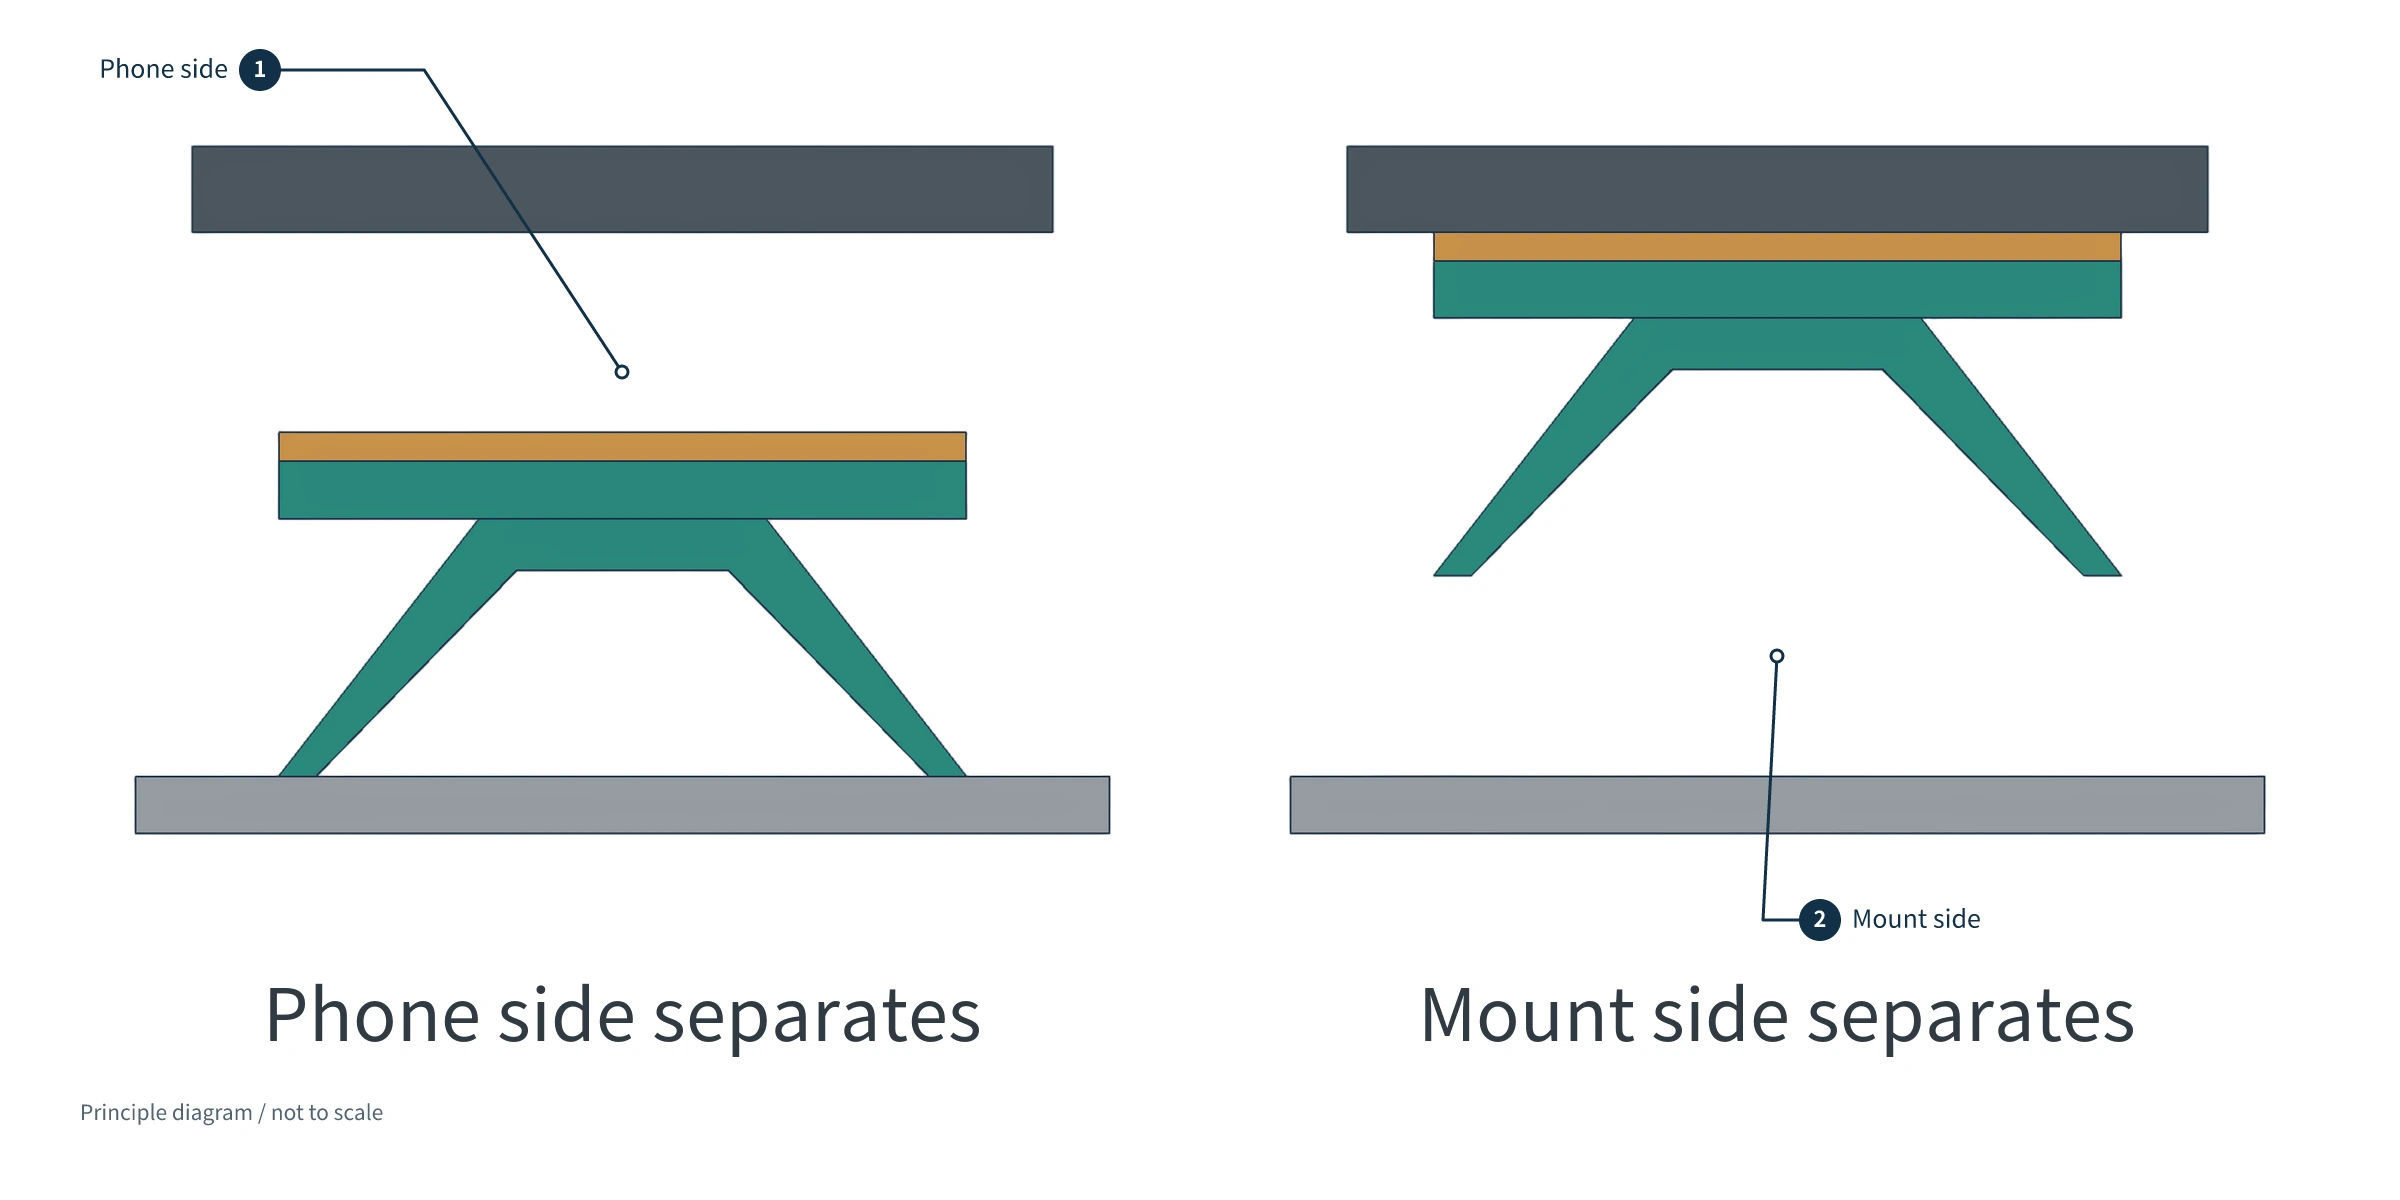
If the phone falls during a suspension test on a mirror, first check which parts of the phone case, pad, and mirror remain connected. If the pad is still attached to the phone case but the cups have come away from the mirror, check cup contact with the mirror first. If the pad remains on the mirror but the phone case has separated from the pad, check the connection on the phone side.
For an adhesive-backed pad, examine the adhesive layer on both the phone case and the silicone pad. If the adhesive remains on the pad while the bonding area on the phone case is exposed, record separation between the phone case and the adhesive layer. If the adhesive remains on the phone case while the silicone pad separates from it, record separation between the adhesive layer and the silicone pad. If adhesive residue remains on both sides, or the adhesive layer itself has torn, record this separately rather than classifying it as separation at just one contact surface.
For a double-sided suction pad, inspect the cups on the phone-case side and the mirror side separately, and record which side has left its contact surface. If both ends have separated after the fall, the final condition alone may not reveal which end failed first. Use the test-process records to determine the sequence.
How Small Suction Cups Hold onto a Surface
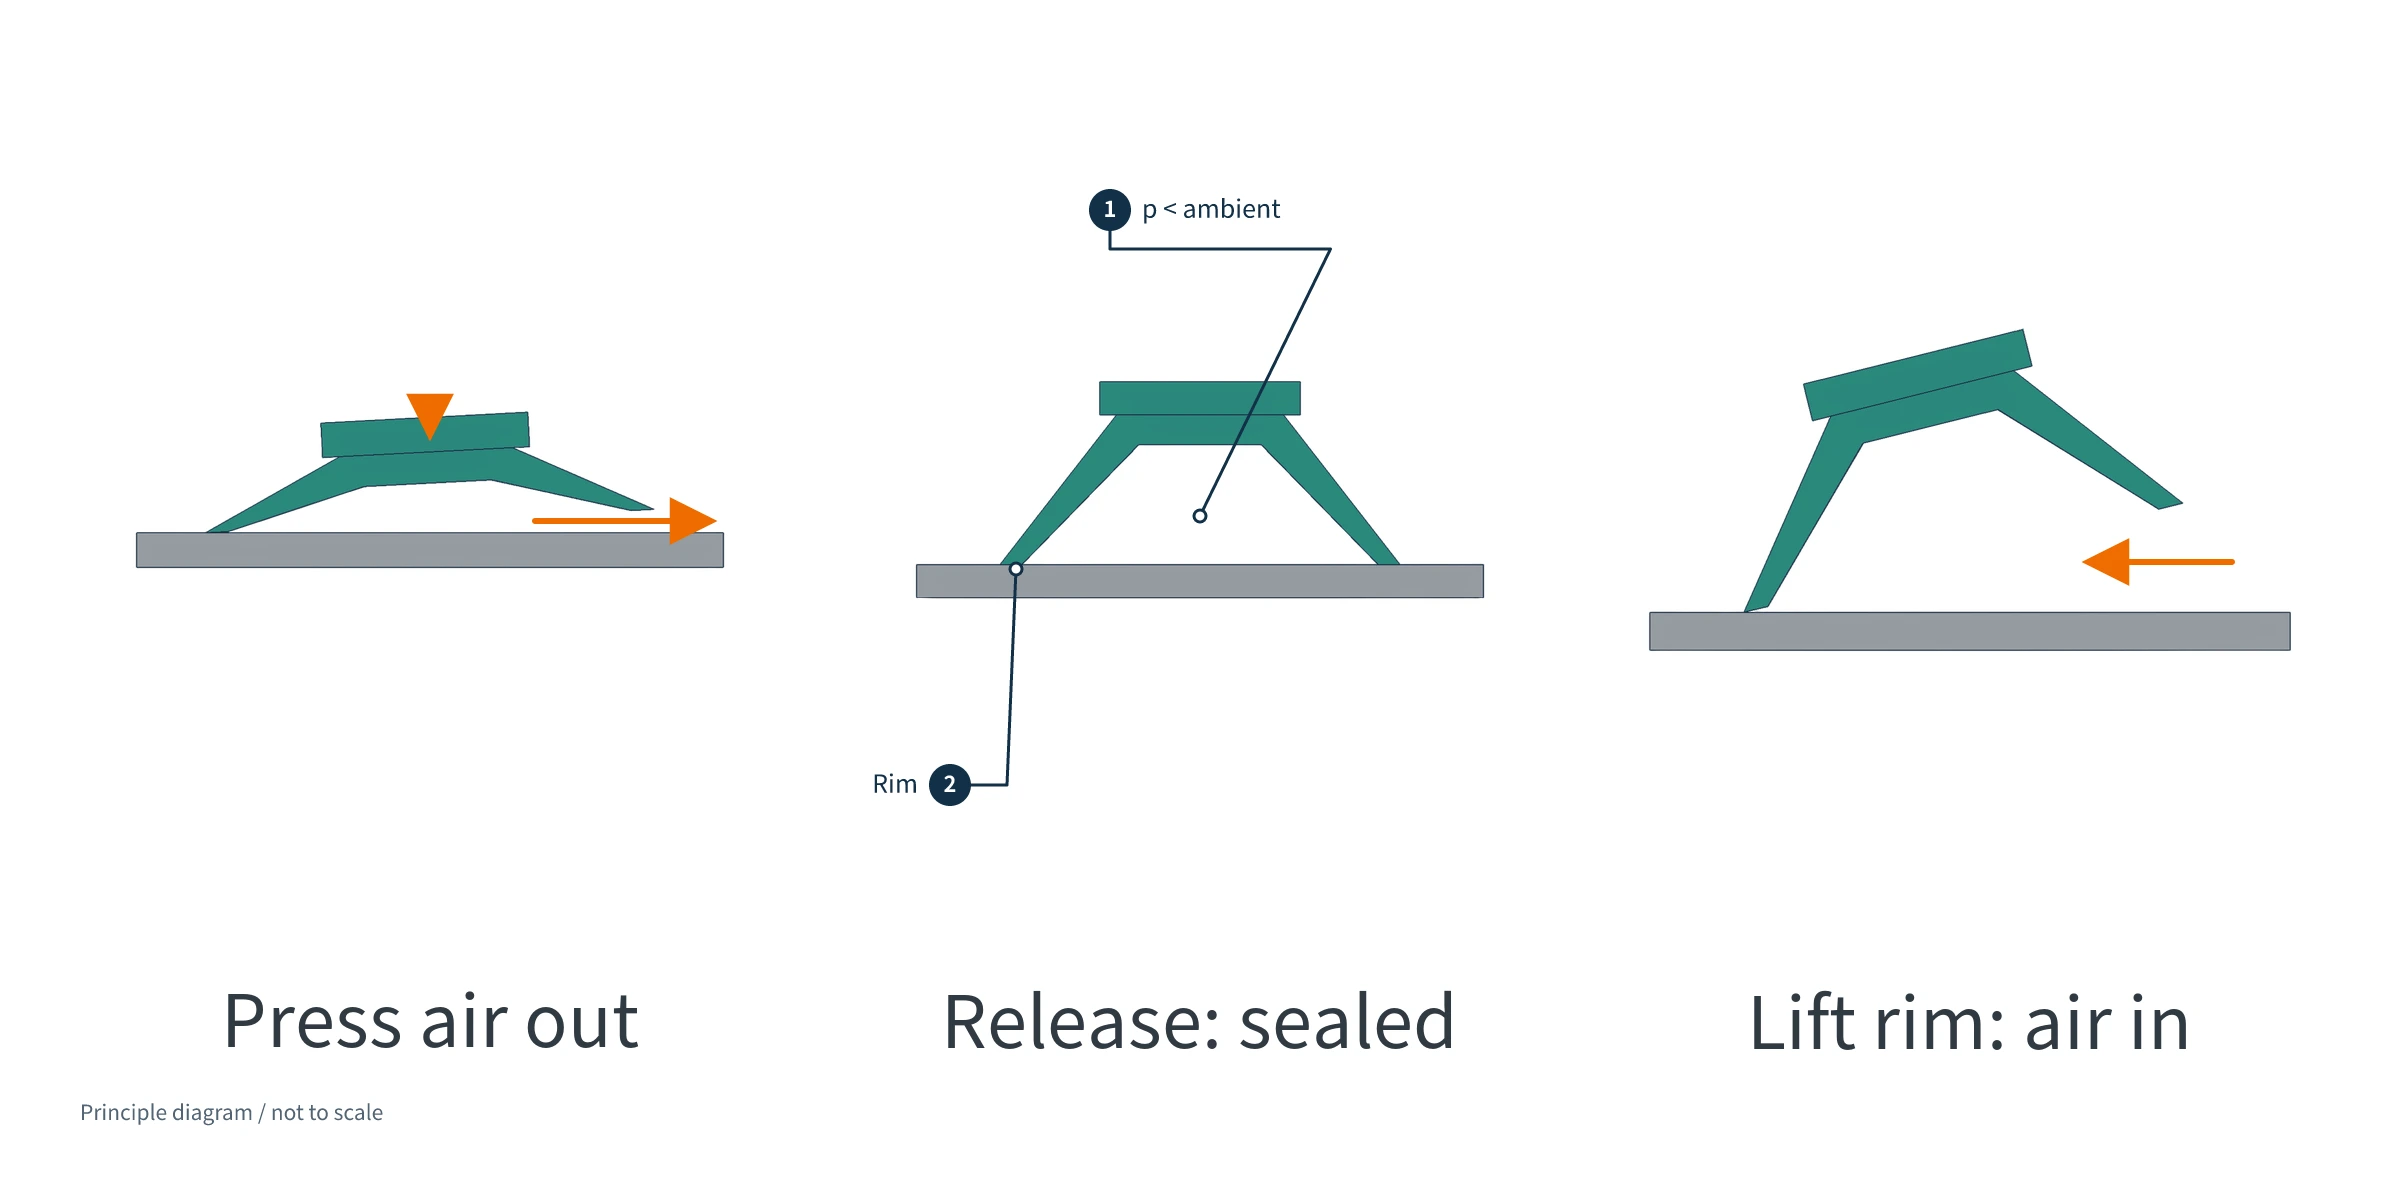
The edge of a small suction cup that contacts the surface is the cup lip. The recessed space it surrounds is the cup cavity. Pressing the cup flattens its body and reduces the cavity volume, forcing some air out past the lip.
After the pressure is released, the cup body tends to recover its shape, enlarging the cavity. If the lip has sealed against the surface, outside air cannot freely enter, so the pressure inside falls. The higher pressure outside and lower pressure inside create a pressure difference that presses the cup against the surface. Air remains in the cavity; it has not been completely evacuated.
To remove the cup from an edge, lifting part of the lip lets air enter and reduces the pressure difference. Pulling the entire pad straight outward and lifting one edge are therefore two different removal actions.
This also explains why the surface matters. Dust may lift part of the cup lip, while surface texture may leave gaps connecting the cavity to the outside air. A cup that appears to touch a surface may not be sealed around its entire perimeter. Performance on glass also cannot be applied directly to textured wall tiles.
Cup Lip, Cup Body, and Base Plate: Structural Design Checks
A cup needs to compress, establish a seal, and maintain contact under load. Check structural changes against these actions individually.
| Structural feature | What it affects | What to check on samples |
|---|---|---|
| Cup-lip sealing edge | Contact around the entire perimeter and restriction of air entry | Inspect notches, cracks, deformation, and excess thin silicone at the edge, known as flash. If flash prevents lip contact, trim it and then check that the sealing edge has not been damaged. |
| Cup diameter | The area enclosed when the lip seals against the surface | Check whether the lip seals around its entire perimeter. Diameter alone does not establish load capacity. |
| Cavity depth | The initial cavity volume; actual air expulsion and volume change after release also depend on cup shape and pressing | Observe how air leaves during pressing and whether the lip stays against the surface after release. Depth alone does not establish holding time. |
| Cup-wall thickness | Deformation during pressing and after the phone is suspended | Check whether the cup can be pressed down, how it recovers after release, and whether part of the lip lifts from the surface under the phone’s load. |
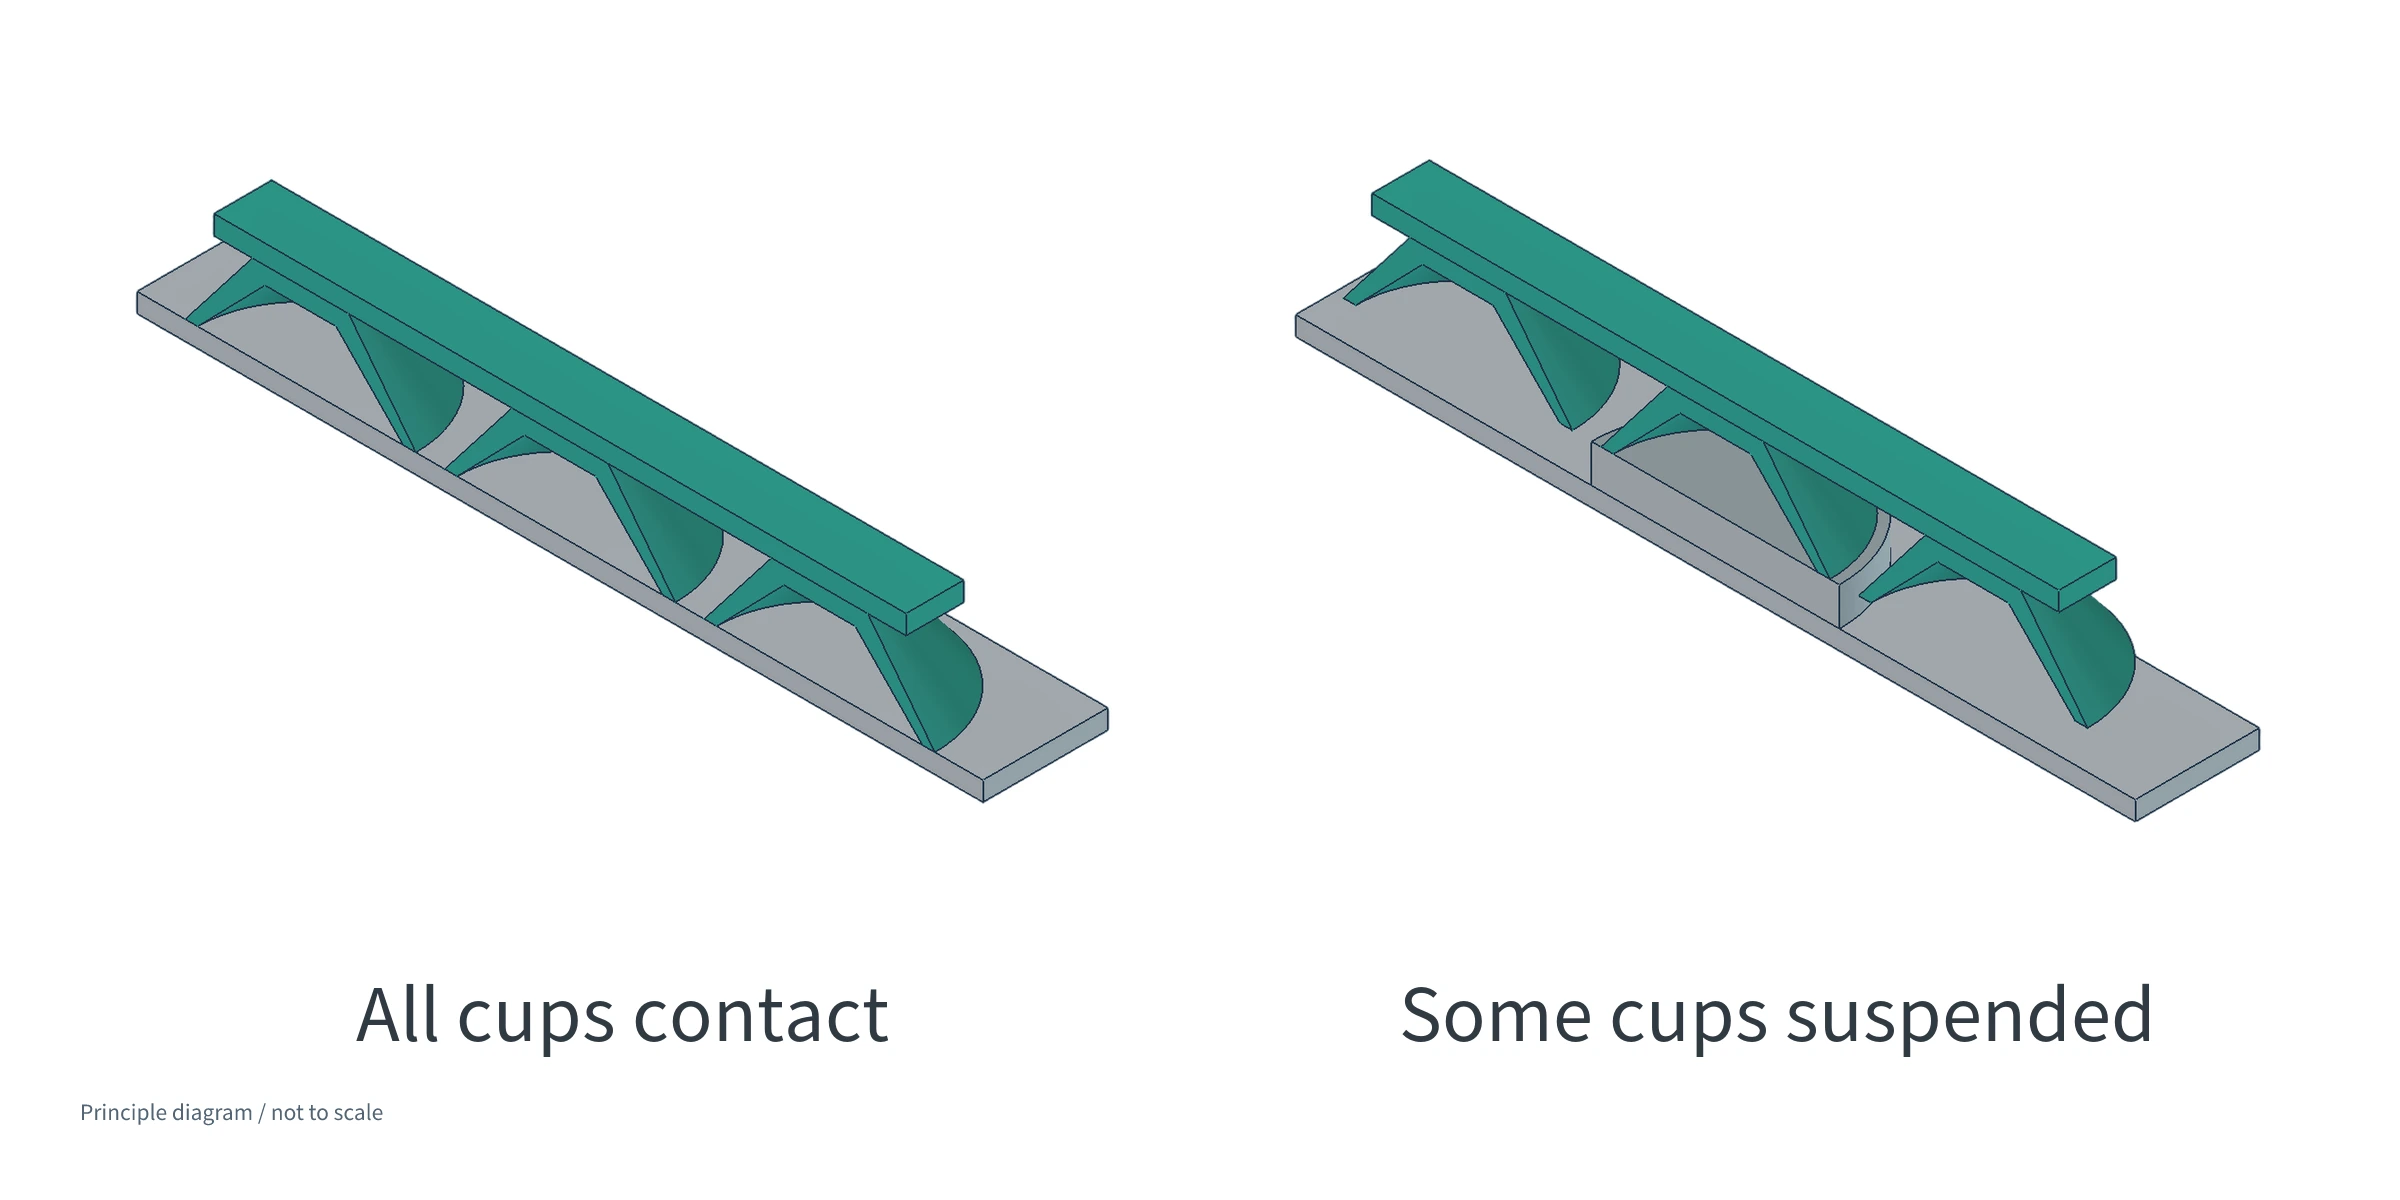
| Base plate connecting the small cups | Which cups can actually reach the mounting surface | Check whether a local raised feature lifts the base plate and leaves gaps between nearby cups and the surface. |
| Cup arrangement | Distribution of the suction area and the groups of cups actually in contact | Check contact at the actual mounting location. Do not simply count the cups shown in the drawing. |
A local raised feature on the mounting surface may lift the base plate, preventing nearby cups from reaching the surface. The diagram below shows this situation. Adding more cups cannot compensate for cups that remain out of contact.
Check the phone-case side separately. On a double-sided pad, check whether the cups contacting the case seal properly. On an adhesive-backed pad, check whether the bonding area lies flat against the case. Proper contact on the mirror side does not establish that the phone side is secure.
Consider material softness together with the structure. A lip that deforms to follow the surface can seal more effectively. However, after the phone is suspended, check whether cup-body deformation lifts part of the lip from the surface. Such a gap may let air enter the cavity and weaken the pressure difference described earlier.
A cup body that is too stiff to press down may also make inadequate contact. When comparing materials, examine both contact after pressing and the condition under the suspended phone’s load. Do not assume that softer always means stronger adhesion.
Shore hardness (durometer) measures the material’s resistance to penetration by an indenter, not the suction force of a phone pad. Compare two silicone materials using the same hardness test method and specimens that meet its thickness and flatness requirements: flat silicone samples prepared for material testing.
The cup lip is thin, and its contact area may be curved. Measuring directly there can produce readings affected by thickness and shape. Do not use an arbitrary reading to compare materials. Whether the finished product can hold a phone still needs to be assessed through holding and removal tests on the actual assembly.
Testing Phone Suction Pads: Suspension, Pull-Off, and Edge Removal
When a phone hangs on a vertical mirror, its weight pulls it downward. The pressure difference mainly presses the cups against the mirror, while friction at the contact surface resists downward sliding. As air slowly leaks past the lip, the pressure difference and pressing force weaken, and the phone may slide before detaching. Observe whether it remains attached and whether it has slid as two separate conditions.
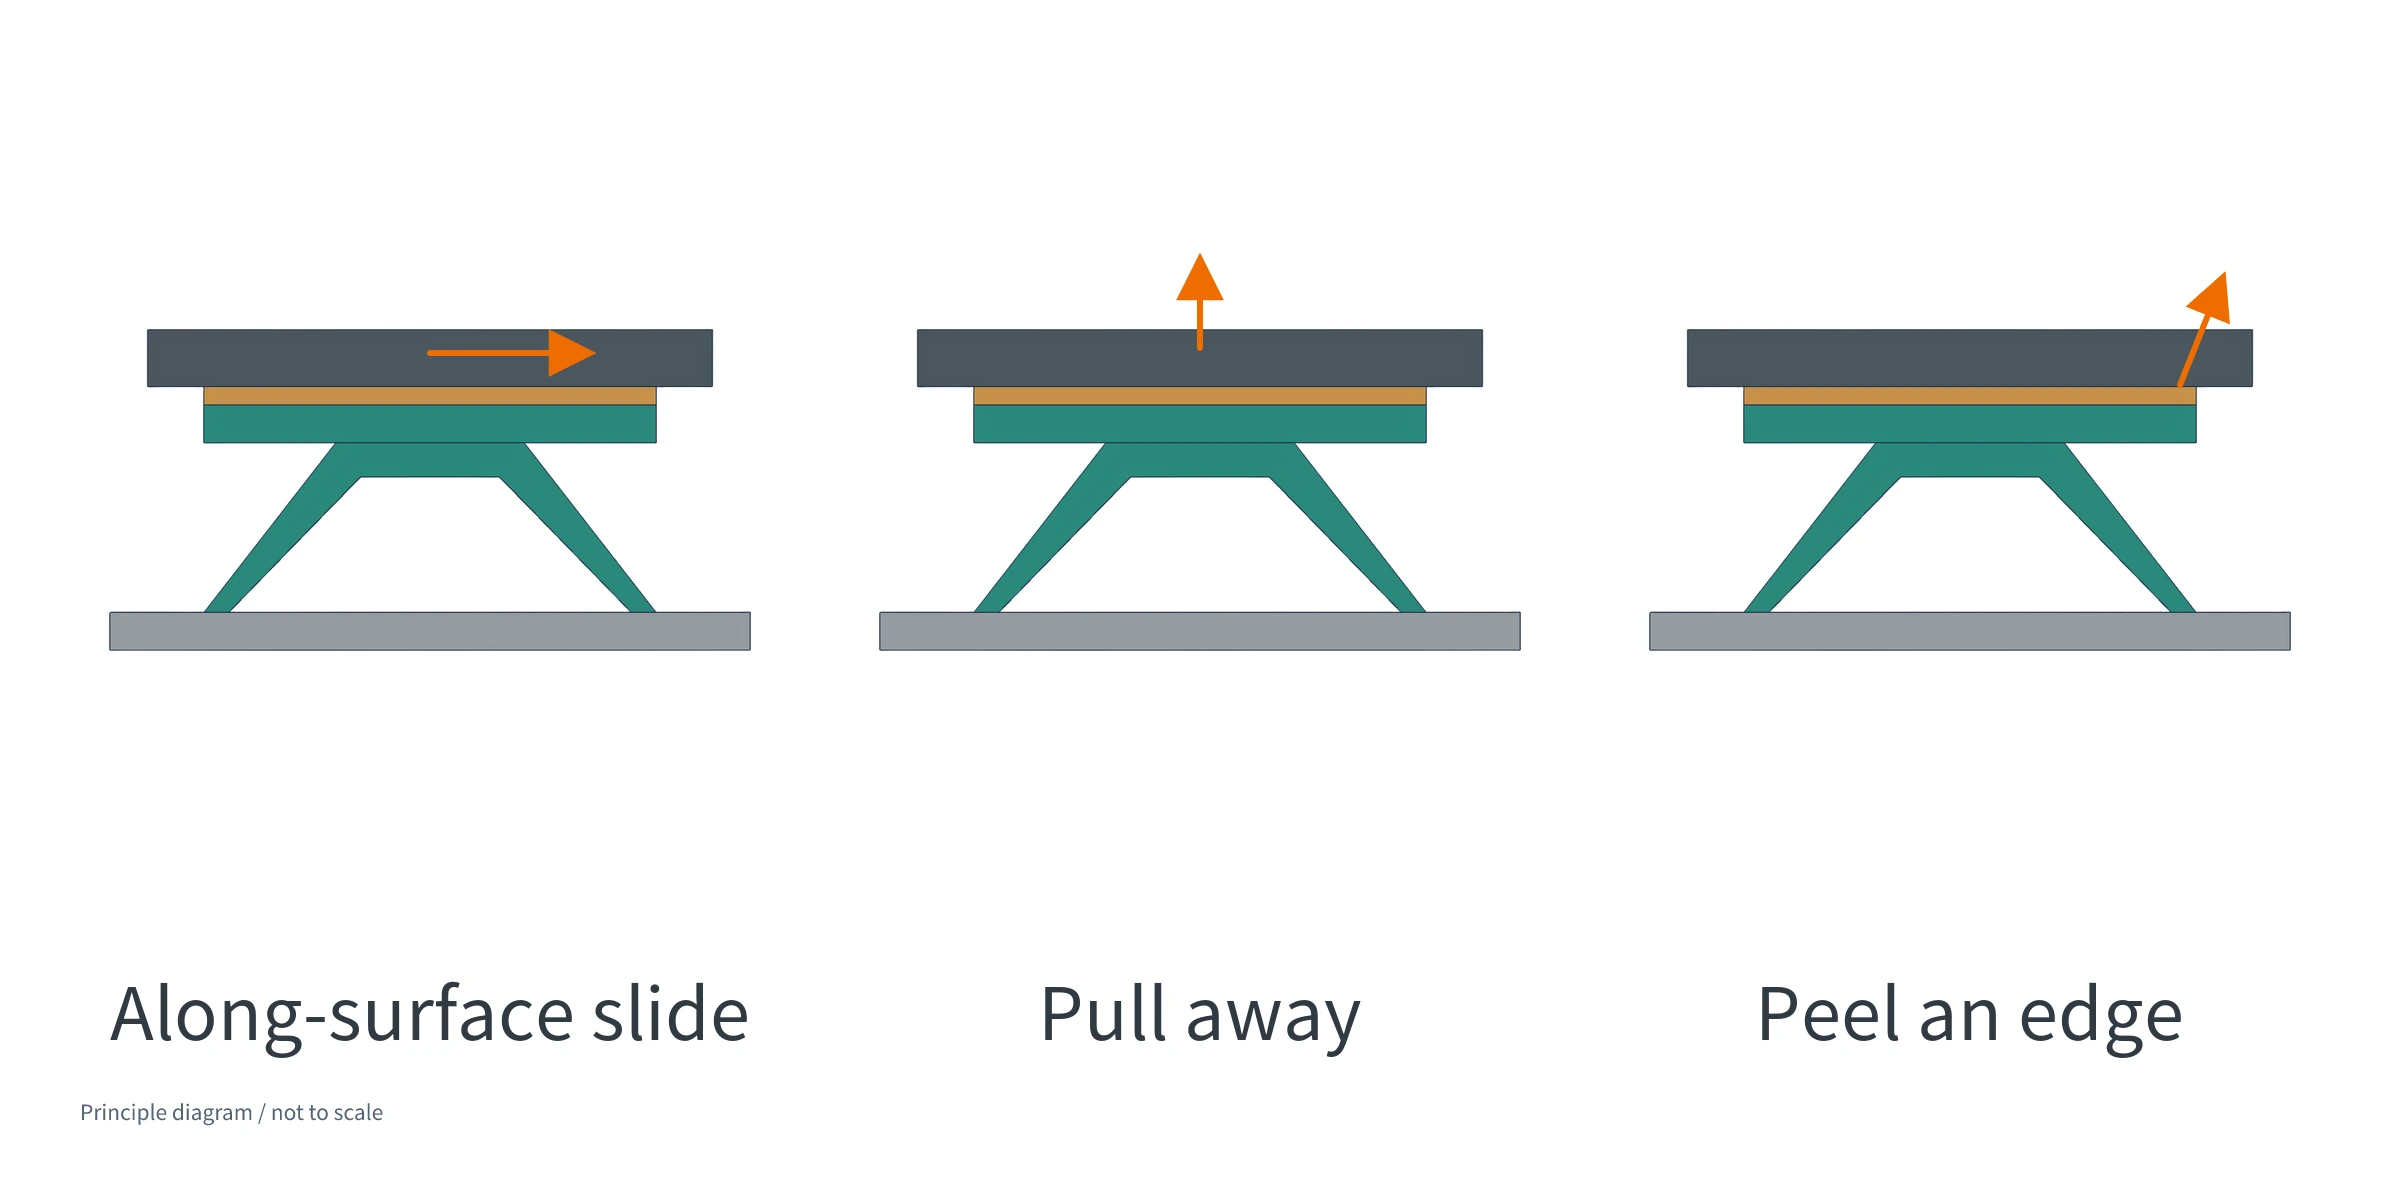
| Test action | How to make a comparison | What to record |
|---|---|---|
| Sustained suspension | Use the same phone and case, mounted at the same location and orientation on the same surface. | Times of first sliding, detachment, and the end of observation, along with the location of movement or separation. |
| Outward pull-off | Use a force-measuring device to pull the phone case at an agreed location, perpendicular to the mounting surface. Keep the pulling location and speed the same for both comparisons. | Record force during pulling and the separation process. Select the metric before comparing, such as force at the first sign of separation or the maximum force during the complete pull. Use the same metric for both tests and record which connection separates first. |
| Removal from an edge | Choose one side of the phone case and lift it progressively. Use the same location and action for both comparisons. | Check whether cups near that side begin to release, whether the phone-side connection is also pulled apart, and whether cracks or adhesive damage appear after removal. |
Difficulty pulling the phone straight off in a brief test does not prove that it can remain on a mirror for hours. Easy removal by lifting an edge also does not mean it will slide down the surface easily.
An existing set of anonymous observation records gives the following approximate times:
| Contact surface | Time summarized in the records |
|---|---|
| Glass | About 2-4 hours |
| Mirror | Close to 5 hours |
| Tile | About 2 hours |
The tester, load, relationship between the records and individual samples, and complete test conditions are not yet clear. The tile record of about two hours also does not state whether this was the time of detachment or the end of observation. These figures can therefore only be reported as an observed range. They cannot guarantee this product’s holding time or establish a ranking of the three surfaces.
Before comparing two structural designs, specify which change the test is intended to assess. For example, to examine the effect of cup-wall thickness, keep other conditions as consistent as possible, including material, total mass of the phone and case, mounting location, contact surface, and pressing action. Record the specific structural version of each sample.
If material, cup shape, and arrangement all change together, the overall performance of the two sample sets can still be compared. However, a difference in holding time cannot be attributed to a single dimension. Record surface material, texture, cleanliness, wet or dry condition, temperature, humidity, and the number of samples used for each design.
The installation action also needs to be consistent: where pressure is applied, how it is applied, and for how long. For adhesive-backed pads, record the bonding and waiting conditions required by the actual adhesive system. Start timing sustained observation when installation is complete. If the pad is still attached when observation ends, report that it held until the observation endpoint and state the duration. Do not treat that endpoint as the maximum holding time.
If the product is intended to be removed repeatedly or reused after cleaning, standardize and record the steps for each cycle before testing: which edge of the phone is lifted, whether the cup contact surfaces are washed, the cleaning method, and the drying procedure. Apply the same procedure in every cycle, then retest with the same phone, contact surface, and installation action.
Washing only the cup contact surfaces and soaking the adhesive backing are different treatments and should be recorded and checked separately. First confirm that the cleaning method is suitable for the selected silicone, adhesive layer, and phone case. Do not assume that every washing method is acceptable. Existing records do not establish a reusable cycle count, and a single holding-time result cannot be converted into cycle life.
Customizing Outline, Colors, and Foldable Designs
YueHouDZ’s public Silicone Suction Phone Holder product listings offer color, logo, and foldable design options. The adhesive-backed and double-sided designs discussed earlier describe how the pad attaches on the phone side. Whether the product folds is a separate design choice. Brands can also propose requirements for outlines, color combinations, and graphics.
Outline. Circular, square, rounded geometric shapes, or a brand’s own symbol can be starting points for a design. Combining outlines and graphics can create different styles within a single range. After changing the outline, check cup-lip contact and base-plate contact on actual samples.
Colors and branding. Designs can use a brand’s main color, contrasting colors, or coordinated color sets, with logos and graphics on the visible surface. Define the visual effect first, then confirm how it will be produced. A color or graphic concept does not itself establish that a particular printing process has been validated.
Foldable designs. A foldable version can combine an internal folding metal component with an outer silicone covering. During production, the folding metal component is placed in the mold first, and the outer silicone layer is then molded around it. This construction can be combined with different outlines, colors, and graphics.
A foldable design changes the product’s form; it does not establish stronger suction. Test adhesion performance in the actual assembled condition.