Silicone sleeves protect digital multimeters from drops, scratches, and harsh environments. In this article, we’ll go through the practical steps of designing a silicone sleeve — from measurement, to design, to creating a 3D model ready for production.
Why Silicone Sleeves Are Needed
Digital multimeters are often used in messy or rough workplaces. Tools may be scattered, accidental drops happen, and impacts are common. A silicone sleeve provides:
- Drop resistance and shock absorption
- Anti-slip grip
- Heat and UV resistance
- Extended product lifespan
Step 1 — Measuring the Device
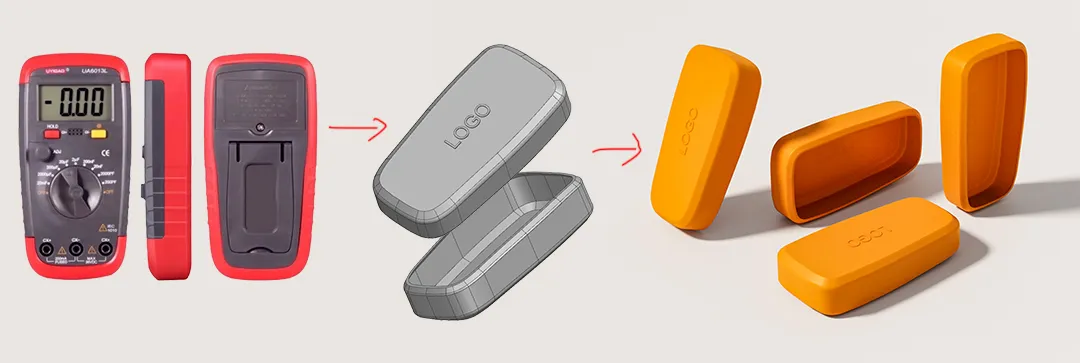
We worked with the UA6013L Capacitance Meter as an example. Since we didn’t have the physical device, we relied on official three-view drawings. The outlines were scaled to match the published dimensions, then traced to get accurate length, width, and thickness.
| Parameter | Value | Notes |
|---|---|---|
| Length | 143 mm | Based on official data |
| Width | 74 mm | Scaled from drawing |
| Thickness | 35 mm | Scaled from drawing |
| Chamfers/Rounds | Yes | Top & bottom edges |
Step 2 — Designing the Silicone Sleeve
The sleeve was designed as a full protective cover with the following features:
- Wall thickness: 1.5 mm, balancing cost and protection.
- Edge treatment: Chamfers and fillets were applied to avoid sharp edges, improving durability and hand feel.
- Internal fit: Hollowed to match the device shape.
- Logo embossing: Raised logo of 0.5 mm on the bottom, simple and easy to produce.
- Weight estimation: With silicone density of 1.2, final weight about 372 g.
Step 3 — Creating the 3D Model
After the outline was built, we:
- Extruded the shape and created the inner cavity.
- Added openings for screen and buttons.
- Applied corner rounding for comfort and strength.
- Selected PANTONE 723 C (C-series) to prepare for accurate silicone coloring.
The design was rendered into multi-angle images, giving a clear preview of how the sleeve would look in production.
You can also download the 3D model we created for this tutorial here:
Digital Multimeters Silicone Protective Sleeve 3D Model Download
Step 4 — Prototype & Production
Through the above design, we now have a complete 3D CAD model of the silicone sleeve, including accurate dimensions and weight. This model can be exported in STP format and provided to silicone product manufacturers.
When contacting a manufacturer, it is recommended to provide the following information clearly:
| Item | Details to Provide |
|---|---|
| 3D Model | STP file with full dimensions and wall thickness |
| Key Specifications | Overall size (143×74×35 mm), wall thickness (1.5 mm), estimated weight (372 g) |
| Material Requirements | Food-grade or high-tensile silicone, hardness (e.g., 60° Shore A), Pantone color code |
| Quotation Request | Sample fee, mold cost, unit price for mass production, lead time, shipping cost |
| Order Quantity | MOQ or your target purchase quantity |
By providing this structured information, communication with manufacturers becomes faster and clearer, ensuring accurate quotes and smoother project execution.
Conclusion
Designing a digital multimeter silicone sleeve involves four key steps: measuring → designing → modeling → prototyping. This ensures the product is protective, practical, and ready for production.
At YueHouDZ, we provide custom silicone manufacturing with free 3D modeling, low MOQ (500 pcs), and strict confidentiality (NDA). From idea to mass production, we support clients every step of the way.
📩
Contact us today for free 3D design & fast quotation — let’s turn your idea into reality.